


If a mailbox was added to Emailgistics with a sign-in password, you can switch it to App Registration without onboarding it again. App Registration connects Emailgistics to the mailbox through a Microsoft Entra app instead of a password. It's our recommended sign-in method, and it's required to move or copy messages between mailboxes.
Switching lets you:
- Remove the sign-in password from the shared mailbox. Microsoft recommends shared mailboxes have sign-in blocked.
- Avoid interruptions caused by Entra identity policy changes that can end the mailbox's session.
- Control access yourself through a security group and a client secret you can rotate or revoke at any time.
- Use Move and Copy to send messages between your shared mailboxes.
There are three parts. You create the app registration and security group once, then switch each mailbox in Emailgistics Admin one at a time.
Before you start
Steps 1 and 2 happen in Microsoft 365 and need an admin who can grant admin consent. Step 3 happens in Emailgistics Admin.
| Steps | Who | What they do |
|---|---|---|
| 1 and 2 | Microsoft 365 admin (usually a Global Admin) | Creates the app registration, the security group, and the access policy |
| 3 | Emailgistics System Administrator | Switches each mailbox on the Authentication tab |
Already using App Registration for other mailboxes? You can reuse the same app and client secret. Skip Step 1, add the mailbox to your existing security group in Step 2, and go to Step 3.
Plan your timing:
- Create the app registration at least a day before you switch. Microsoft can take up to 24 hours to make a new app ready to use.
- The access policy in Step 2 can take up to 30 minutes to take effect.
- Switch mailboxes outside business hours. Email processing for the mailbox may pause briefly during the switch.
Step 1: Create the app registration
You'll finish this step with three values: an Application ID, a Client Secret, and the secret's expiry date. Keep them somewhere safe for Step 3.
Create the app
Sign in to the Microsoft Azure portal and go to Microsoft Entra ID.
Choose Add, then Enterprise application.
Choose Create your own application.
Enter a name (we suggest "Emailgistics") and select Register an application to integrate with Microsoft Entra ID (App you're developing).
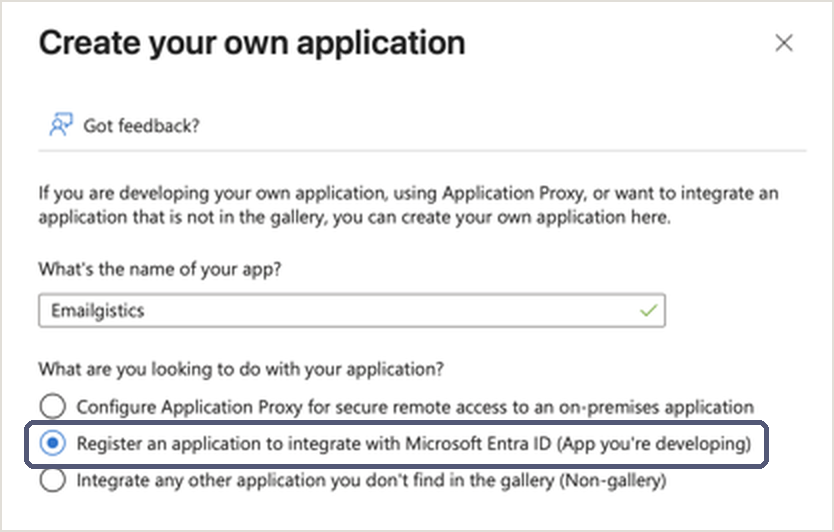
Click Create.
Choose Accounts in this organizational directory only (Single tenant).
Click Register.
Add permissions
In the Azure search bar, open App registrations, select All applications, and click your new app.
Select Manage, then API permissions.
Click Add a permission, choose Microsoft Graph, then choose Application permissions. Don't choose Delegated permissions.
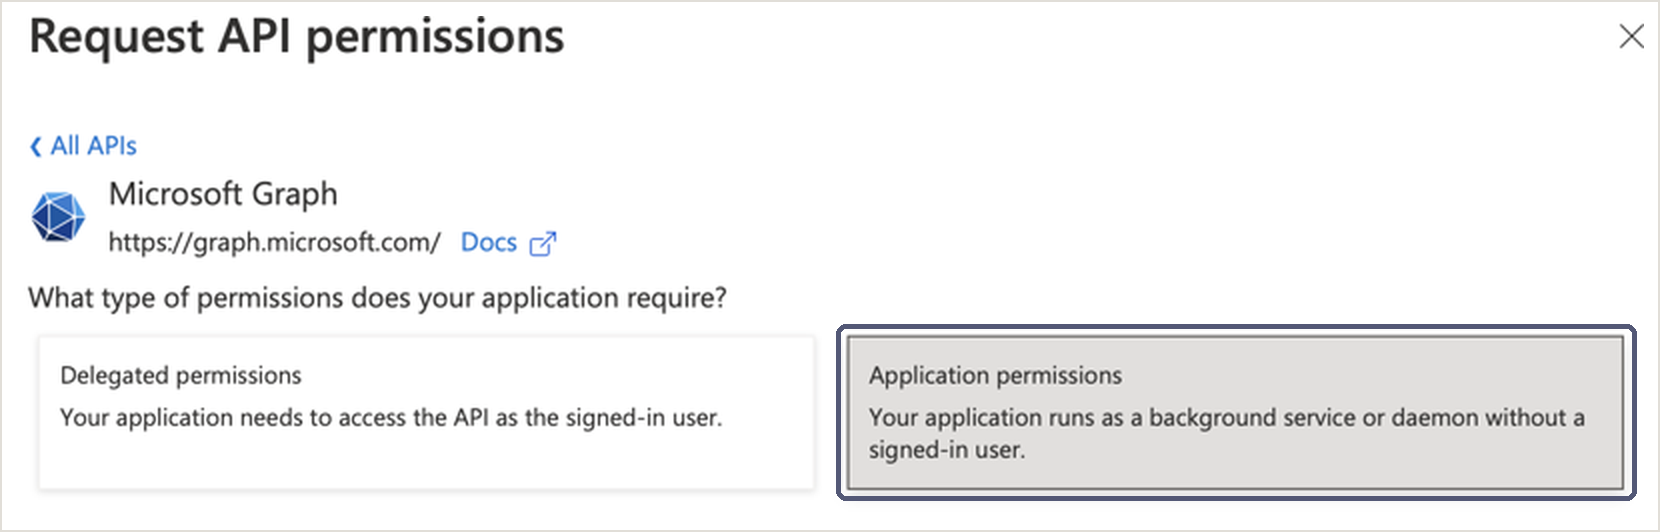
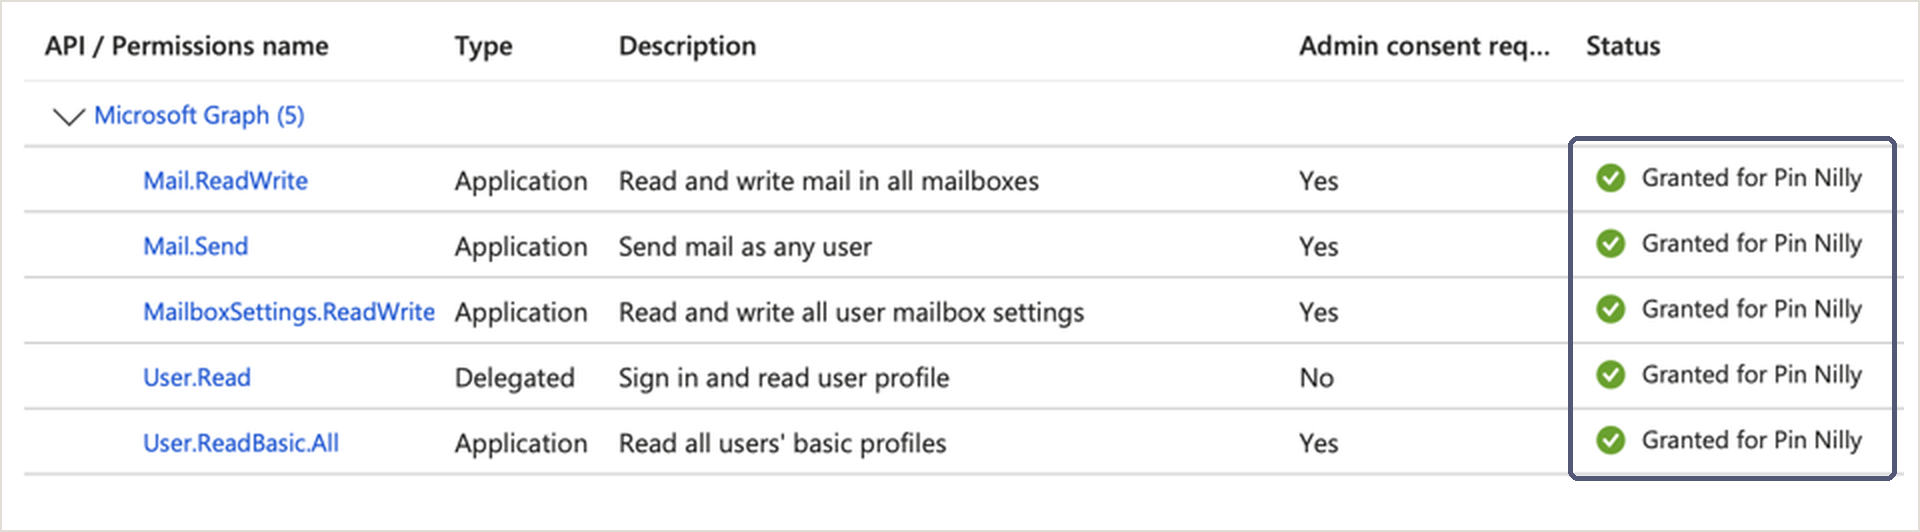
Check these four permissions, then click Add permissions:
- Mail.ReadWrite
- Mail.Send
- MailboxSettings.ReadWrite
- User.ReadBasic.All
Click Grant admin consent for your tenant and confirm. Each permission should now show Granted for your tenant.
Create the client secret
In the left menu, choose Certificates & secrets, then click New client secret.
Enter a description, pick an expiry, and click Add.
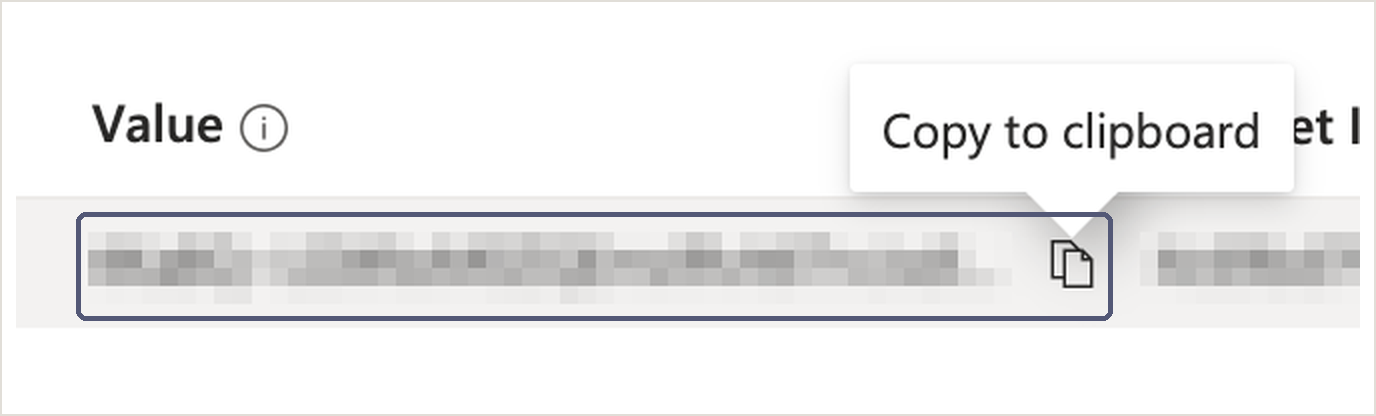
Copy the secret's Value right away and note the expiry date. Azure only shows the value once. Copy the Value, not the Secret ID.
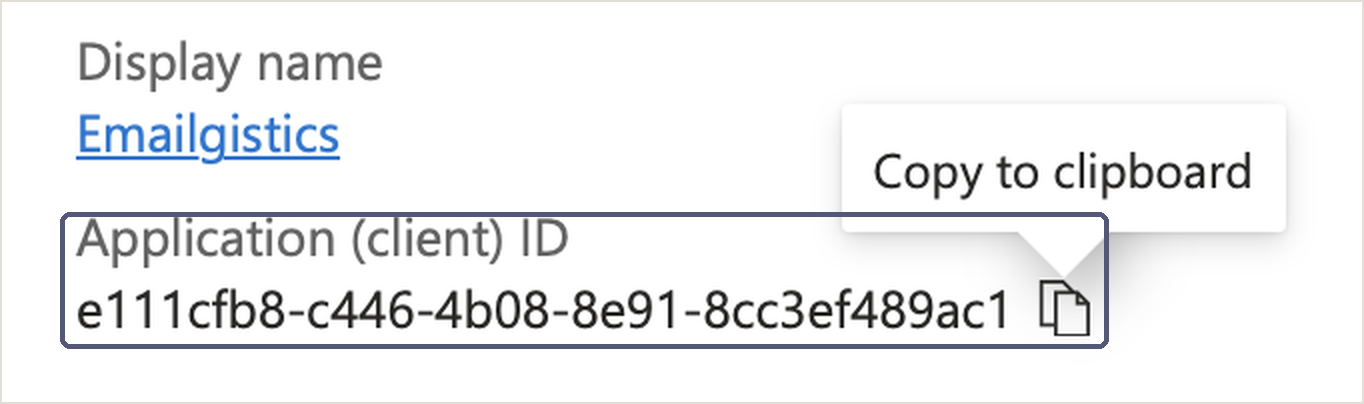
Click Overview in the left menu and copy the Application (client) ID.
Step 2: Limit the app to your shared mailboxes
This step locks the app so it can only reach the shared mailboxes in one security group. Add every mailbox you plan to switch now. You only need to do this once, even though Step 3 is done one mailbox at a time.
Create the security group
In the Exchange admin center, go to Recipients, then Groups.
Click Add a group, choose Mail-enabled security, and click Next.

Give the group a name and click Next.
Assign one or more owners who can add and remove mailboxes later, and click Next.
Click Add members, add all the shared mailboxes you plan to switch, and click Next.
Give the group an email address and note it. Click Next, then Create group.
Apply the access policy
- Open Windows PowerShell and connect to your tenant:
Connect-ExchangeOnline
- Run this command. Replace the two values with your Application ID from Step 1 and the group email address you just created:
New-ApplicationAccessPolicy -AppId <YourApplicationID> -PolicyScopeGroupId <[email protected]> -AccessRight RestrictAccess -Description "Restrict this app to shared mailboxes."
The policy can take up to 30 minutes to take effect.
Optional: check a mailbox before you switch it. This command should return Granted for each mailbox in the group:
Test-ApplicationAccessPolicy -Identity <[email protected]> -AppId <YourApplicationID>
Adding more mailboxes later? Add them to the same security group. You don't need to run the policy command again.
Step 3: Switch each mailbox in Emailgistics Admin
Repeat these steps for each mailbox you're switching. Every mailbox uses the same Application ID, Client Secret, and expiry date.
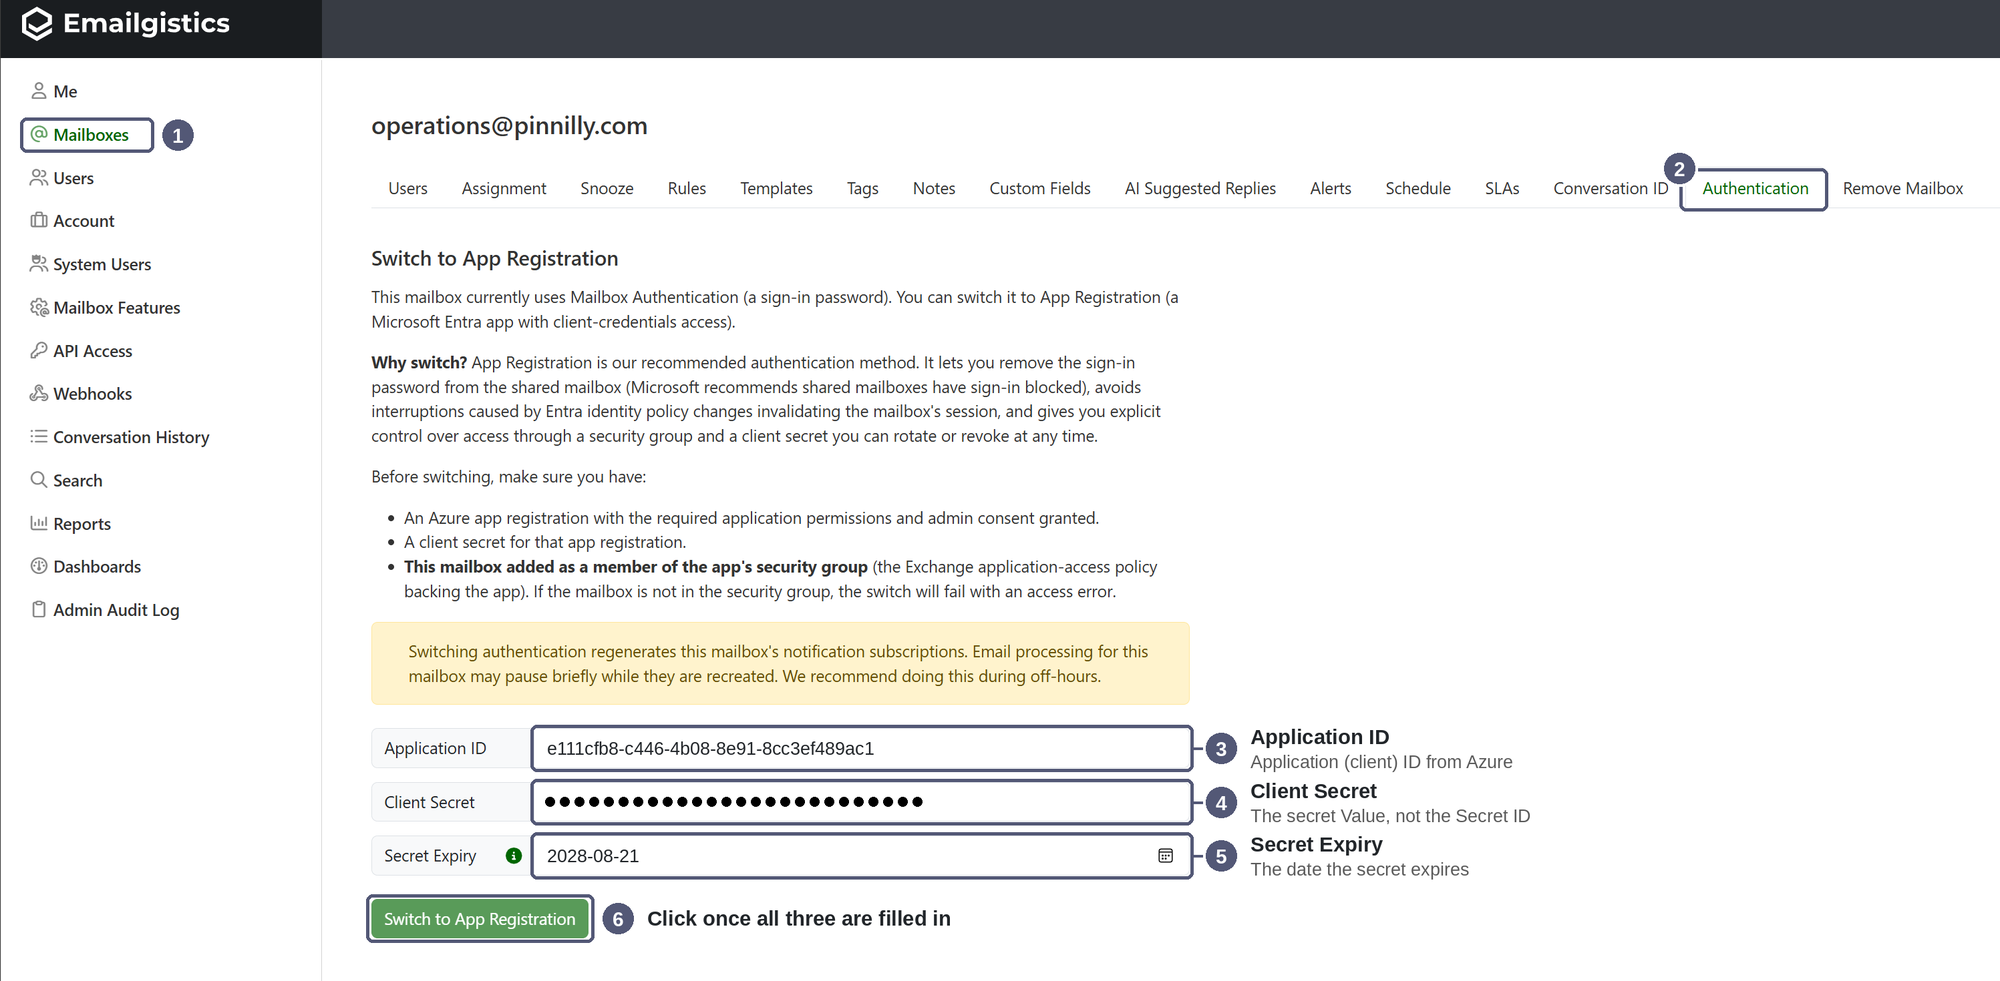
- Sign in to Emailgistics Admin and click Mailboxes, then select the mailbox.
- Open the Authentication tab.
- Paste the Application ID (the Application (client) ID from Azure).
- Paste the Client Secret (the secret's Value, not its Secret ID).
- Enter the Secret Expiry date from Azure. We'll use it to remind you before the secret expires.
- Click Switch to App Registration.
If you see an access error, the mailbox isn't in the security group yet, or the access policy hasn't taken effect. See Troubleshooting below.
After you switch
- Block sign-in on the shared mailbox. Once mail is processing normally, you can block sign-in for the mailbox in the Microsoft 365 admin center. Emailgistics no longer needs the password.
- Watch for the secret expiry. Emailgistics alerts you before the client secret expires. Create a new secret in Azure and update it in Emailgistics Admin before the old one runs out.
- Try Move. Your team can now move or copy messages between mailboxes from the Emailgistics add-in.
Troubleshooting
| What you see | Likely cause | Fix |
|---|---|---|
| Access error when you click Switch to App Registration | The mailbox isn't in the app's security group, or the access policy hasn't taken effect yet | Add the mailbox to the group, wait 30 minutes, and try again. Run Test-ApplicationAccessPolicy to confirm. |
| Invalid credentials or app validation fails | The Secret ID was copied instead of the Value, or the secret has expired | Create a new client secret in Azure and copy the Value |
| Permissions error | Admin consent wasn't granted | In the app's API permissions, click Grant admin consent for your tenant |
| A new app fails right after you create it | Microsoft hasn't finished setting up the app | Wait up to 24 hours and try again |
| Mail isn't processing after the switch | A short pause is normal while notifications reset | If it lasts more than 30 minutes, contact support |
Need a hand? Email [email protected] and we'll walk you through it.