


How to convert a distribution list to a shared mailbox

Introduction
Collaboration and teamwork are essential in today's business landscape, and Outlook has improved this with features like shared mailboxes and distribution lists. But the two work very differently under the hood, and a distribution list won't get you there, whether your team wants to use a shared mailbox management tool like Emailgistics or simply wants real team visibility into a shared inbox. This guide walks through why the difference matters, a phased conversion process that avoids losing any incoming email, and what to do if you're starting from a user mailbox instead of a distribution list.
Distribution list vs. shared mailbox
A distribution list is a forwarding address. When someone emails the DL, Microsoft 365 copies that message to every member's personal inbox. The DL itself doesn't store mail and doesn't have a folder anyone can open. Replies come from individual members' addresses, not the DL, and there's no shared view of who responded to what.
A shared mailbox is a real mailbox in Microsoft 365 with its own inbox, sent items, and folders. Everyone with permission sees the same view, so the team can collaborate on incoming email instead of duplicating work or missing replies. This is the foundation tools like Emailgistics need in order to add assignment, tagging, rules, and reporting on top.
The short version: a DL forwards mail, a shared mailbox stores it. Emailgistics needs the second one.
For a deeper look at the trade-offs between the two, see distribution group vs. shared mailbox: what's best for your team?
How shared mailbox tools use this structure
Emailgistics is built natively for Microsoft 365 shared mailboxes. It lives inside Outlook and adds team-level email management on top of an existing shared mailbox. Once connected, your team can assign emails to specific members, tag messages, build automated rules, track service levels, and pull reporting, all from the same Outlook interface they already use.
Because Emailgistics works directly with the mailbox itself, it needs a shared mailbox to operate; a distribution list won't work. If you're setting up a shared mailbox from scratch rather than converting an existing one, how IT teams should structure shared mailboxes in Microsoft 365 is a good starting point before you convert anything.
The conversion process at a glance
Rather than deleting the distribution list and hoping nothing breaks, the safest path is a phased build-then-cutover: create the new shared mailbox under a temporary address first, get it fully working, and only then swap it in for the production address. The diagram below shows the three phases; detailed steps follow.
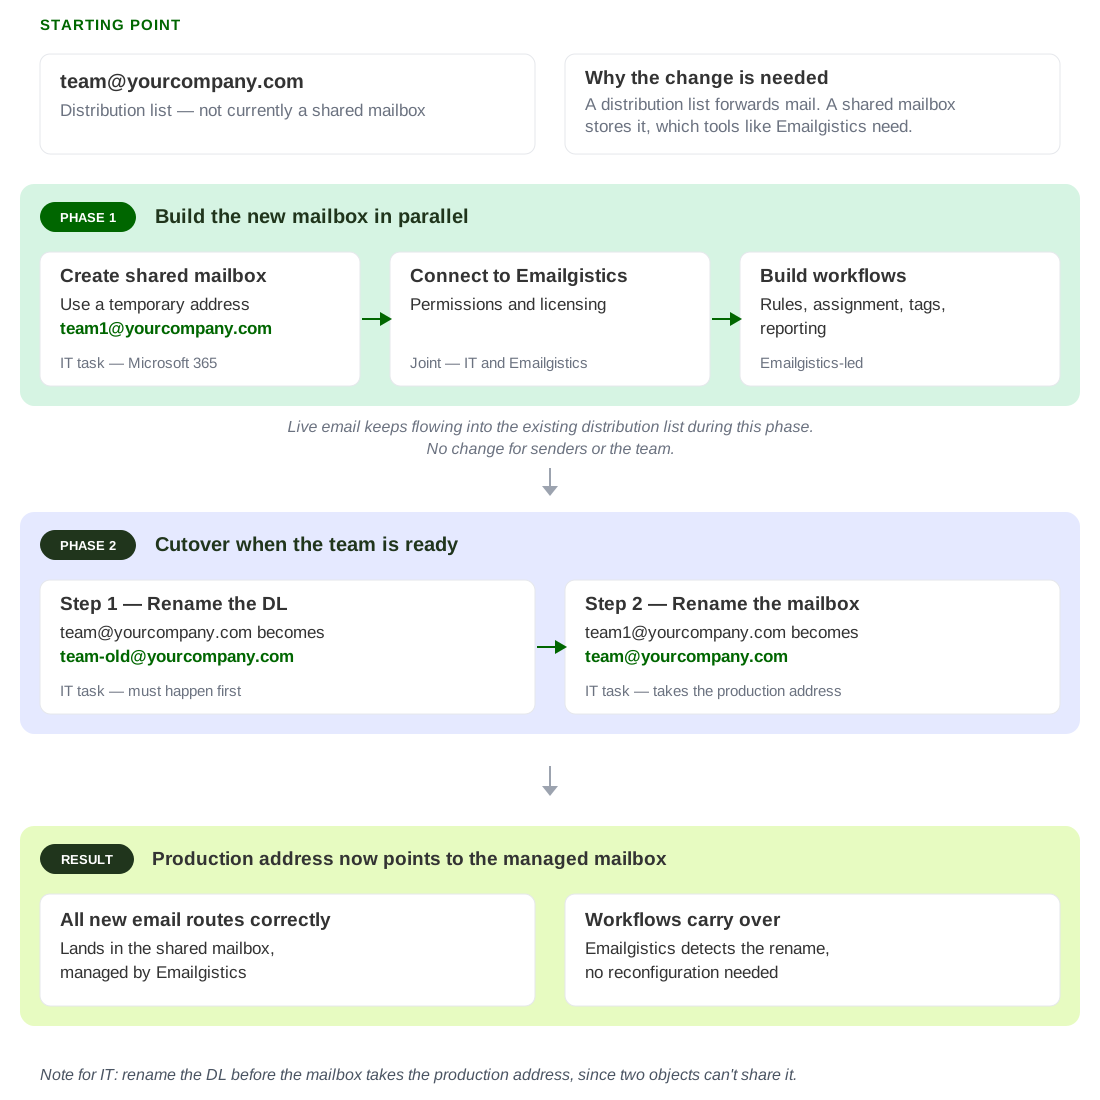
Phase 1: Build the new mailbox in parallel
In this phase, your IT team creates the new shared mailbox under a temporary address. Your existing distribution list keeps running as normal, and nothing changes for senders or the team until you're ready to go live.
Step 1: Create the shared mailbox with a temporary address
- Sign in to the Microsoft 365 admin center as a global admin or Exchange admin.
- Go to Teams & groups > Shared mailboxes and select Add a shared mailbox.
- Give the mailbox a name and use a temporary email address. A simple convention is to add "1" to the address you eventually want to use. For example, if the final address will be [email protected], create it as [email protected].
- Add team members to the shared mailbox with Full Access permission so they can read and reply from it. See shared mailbox ownership and access best practices for how to think about who gets which permission level.
Step 2: Connect the mailbox to Emailgistics
Your Emailgistics onboarding contact will walk you through this part: the connection, the permissions, and the initial setup, together with your IT team. This is also when your team's folder structure gets created inside the mailbox.
Step 3: Build your workflows
With the mailbox connected, set up the rules, assignment logic, tags, and reporting your team will use day-to-day. Because nothing is live yet, this is a low-pressure window to test and refine before the cutover.
Phase 2: Cutover when the team is ready
Once your workflows are built and tested, your IT team performs a simple two-step swap to move the production email address from the distribution list to the new shared mailbox.
Important: the distribution list must be renamed first. Microsoft 365 won't allow two objects to share the same email address, so the DL has to release the address before the shared mailbox can take it.
Step 1: Rename the distribution list
- In the Microsoft 365 admin center or Exchange admin center, open the existing distribution list.
- Change its primary email address to something off to the side. A common pattern is adding "-old" to the name, for example, [email protected]. This frees up the production address.
Step 2: Rename the shared mailbox to the production address
- Open the new shared mailbox you created in Phase 1.
- Change its primary email address from the temporary one (for example, [email protected]) to the production address ([email protected]).
From the moment the rename completes, all new email sent to the production address lands in the new shared mailbox and flows through Emailgistics.
What changes after cutover
Senders see no difference. They still email the same address.
- New email routes directly to the shared mailbox managed by Emailgistics.
- Your team works from the shared mailbox inside Outlook with assignment, rules, tagging, and reporting active.
- The workflows built in Phase 1 continue working without reconfiguration. Emailgistics detects the rename automatically.
- The renamed old distribution list can be deleted or kept as a backup. Most teams delete it after a week or two of a clean cutover.
Things to plan for
- Email history. Anything currently sitting in individual team members' inboxes from the old distribution list doesn't move automatically. If you need that history available in the new shared mailbox, plan a separate import step with your onboarding contact.
- Licensing. Shared mailboxes under 50 GB don't require their own license, and your existing Microsoft 365 plan covers this in most cases. See Microsoft 365 governance impacts of shared mailboxes for the broader picture, and confirm with IT based on your tenant setup.
- External integrations. If the distribution list address is hard-coded into any external systems (forms, automated alerts, vendor contacts), those will keep working after the cutover, since the address itself doesn't change.
- Timing. Most teams pick a quiet window, like end of day or a Friday afternoon, for the cutover. The rename itself takes a few minutes, but allowing a short pause means any in-flight messages have time to clear.
An alternative if you can't convert the DL
If converting the distribution list isn't an option, there's a workaround. If the DL forwards into an existing shared mailbox that you can connect to Emailgistics, you can build rules inside that mailbox to identify the forwarded messages and route them appropriately. Rules can look at the To field on each incoming email, assign the message to a specific team member, and tag it for tracking.
This works, but it does mean the forwarded mail lives in the same mailbox as everything else, which makes reporting and SLA tracking harder to pull apart later. The phased cutover described above is the cleaner long-term setup. Talk to your Emailgistics contact about which approach fits your situation best.
Converting a user mailbox instead
Not every team starts from a distribution list. If your shared inbox is currently a regular user mailbox (a licensed person's account that the team has been sharing logins to), Microsoft 365 makes this conversion simpler, since it changes the mailbox's type in place rather than moving mail between two separate objects.
In the Microsoft 365 admin center, go to Users > Active users, select the mailbox, open the Mail tab, and choose Convert to shared mailbox. The mailbox keeps its existing address, its inbox, and all its folders, so there's no address swap and no parallel build required. The main thing to check afterward is size: shared mailboxes over 50 GB need their own license, so confirm the mailbox's current size before converting if it's been accumulating email for a while.
Because the conversion happens in place, it's still worth doing during a quiet window, and worth retiring the account's password once the conversion is complete, since a shared mailbox is accessed through delegated permissions rather than its own sign-in.
Maximizing efficiency in shared mailboxes
Once your team is working from a real shared mailbox, Emailgistics adds the pieces Outlook doesn't provide on its own. With the Office 365 add-in, your team can route emails to the right person and leave comments, all within Outlook, so customers don't have to repeat themselves to get an issue resolved. A comprehensive conversation history shows when messages are received, assigned, commented on, replied to, snoozed, or archived.
A customizable dashboard helps motivate your team by showcasing key metrics: inbound and outbound message volume, reply times, user workload, and more. You can set business hours for each shared mailbox and track SLAs effectively, with alerts for unanswered messages so nothing gets left behind.
Your Emailgistics onboarding contact is available to walk through this entire process with your IT team, joining a working session, answering questions ahead of the cutover, and confirming the sequence is set up correctly before anything goes live.
To get a personalized demo of Emailgistics and enjoy a free 14-day trial, book a demo.
A distribution list only forwards mail into each member's personal inbox. It has no inbox, folders, or message history of its own for a tool to act on. Emailgistics needs a real mailbox object to apply assignment, tagging, rules, and reporting to, which is why the distribution list has to become a shared mailbox first.
Not if you use the phased approach in this guide. The new shared mailbox is built under a temporary address while the existing distribution list keeps receiving mail as normal, so nothing changes for senders until the team is ready. The cutover itself is a same-address swap that takes a few minutes.
Usually not. Shared mailboxes under 50 GB don't require their own license in most Microsoft 365 plans, so your existing plan typically covers it. Confirm with your IT team based on your tenant setup, especially if the mailbox has accumulated a lot of email history.
If the distribution list can't be converted, you can forward it into an existing shared mailbox and use rules to route the forwarded messages, though reporting is harder to separate out later. If what you actually have is a user mailbox rather than a distribution list, converting it is simpler still: Microsoft 365 lets you change its type in place, with no address swap needed.
Related posts
- Distribution group vs shared mailbox: What's best for your team?
- Shared inbox management for non-profits: what to prioritize on a lean budget
- When native Outlook shared mailboxes aren't enough: what IT should evaluate
- Managing storage in Microsoft 365 shared mailboxes
- Best practices for managing high-volume shared mailboxes